GoHighLevel and Dialora Integration Guide
Complete Setup and Configuration Manual with Visual Instructions
Overview
This comprehensive guide provides step-by-step instructions with visual references to integrate GoHighLevel with Dialora, creating an automated lead qualification system. The integration enables AI-powered lead qualification calls with automatic pipeline updates based on conversation outcomes.
Prerequisites
Before beginning the integration process, ensure you have:
Part 1: Setting up the GoHighLevel Pipeline
The first step involves creating a dedicated sales pipeline in GoHighLevel to track your leads and opportunities throughout the qualification process.
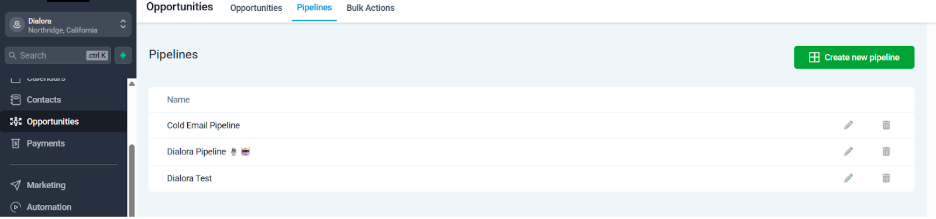
Step 1: Create a New Pipeline
- Access GoHighLevel Dashboard - Log in to your GoHighLevel account - Navigate to the Opportunities section in the left-hand menu
- Navigate to Pipeline Management Click on the Pipelines tab at the top of the page Click the green Create new pipeline button in the top-right corner
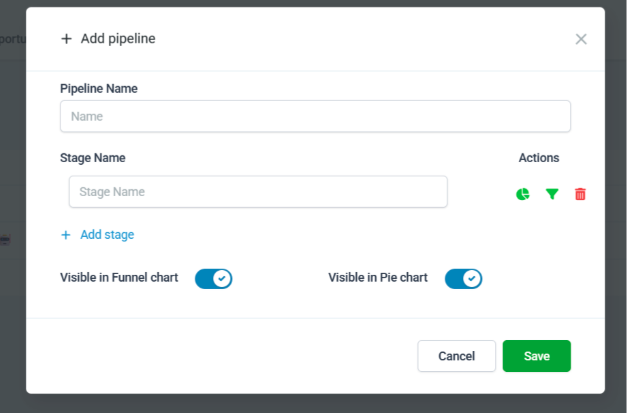
- Configure Your Pipeline - In the “Add pipeline” pop-up window, enter a Pipeline Name (e.g., “Dialora Pipeline”) - Define the stages for your workflow, such as “New Lead” - Click Save to create your new pipeline
- Verify Pipeline Creation - Confirm your new pipeline appears in the pipeline list - The pipeline is now ready for integration with the Dialora workflow
Part 2: Gathering GoHighLevel Credentials
Next, you need to locate and securely store key authentication information from your GoHighLevel account to enable the connection with Dialora.
Step 2: Locate Your Location ID and API Key
- Access Account Settings - From the GoHighLevel dashboard, click on Settings in the main menu - Select Business Profile from the left-hand sidebar
- Collect Required Credentials - Location ID: Found at the top of the Business Profile page - this unique identifier represents your GoHighLevel sub-account - API Key: Located further down on the same page - required for external application connections

- Secure Credential Storage - Copy and securely save both the Location ID and API Key - These credentials will be required for the Dialora integration setup
Important: Keep these credentials confidential and only use them for authorized integrations.
Part 3: Connecting Dialora to GoHighLevel
With your GoHighLevel credentials prepared, you can now complete the integration by connecting your Dialora account.
Step 3: Complete the Integration Setup
- Prepare Your Dialora Account - Log in to your Dialora account - Ensure you have purchased a phone number for agent operations
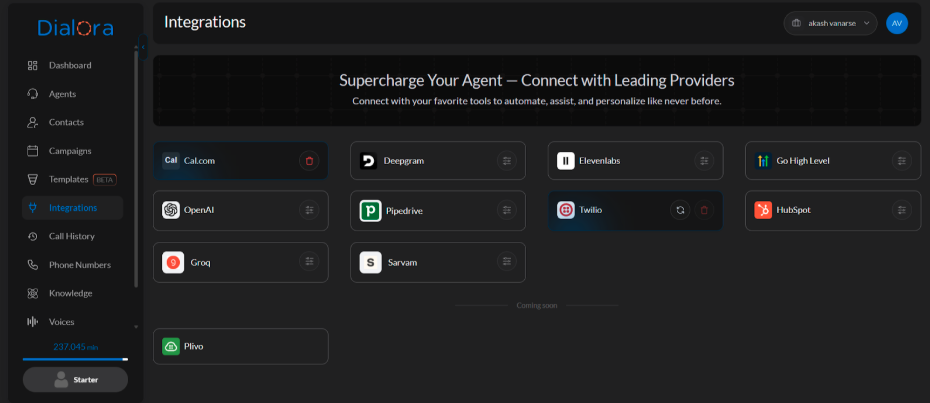
- Access Integration Settings - Navigate to the Integrations tab in the left-hand menu - Locate the GoHighLevel integration option - Click on the settings button for this integration
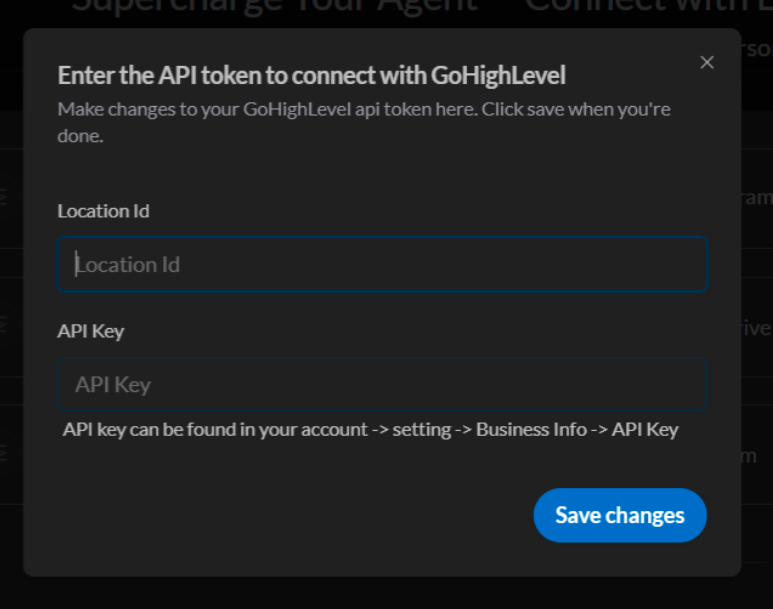
- Enter Authentication Details - In the pop-up window titled “Enter the API token to connect with GoHighLevel”: - Enter your Location ID in the corresponding field - Enter your API Key in the designated field - Click Save changes to establish the connection
- Verify Connection - Confirm that your GoHighLevel account is successfully connected to Dialora - The integration status should show as active
Part 4: Creating the Dialora Lead Qualification Workflow
With the connection established, set up Dialora’s pre-built template to automatically qualify leads from your GoHighLevel pipeline.
Step 4: Configure the Lead Qualification Template
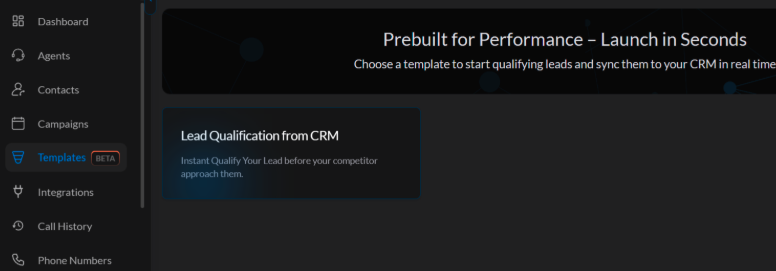
- Access Template Library - In your Dialora account, click on the Templates tab in the left-hand menu - Select the Lead Qualification from CRM template
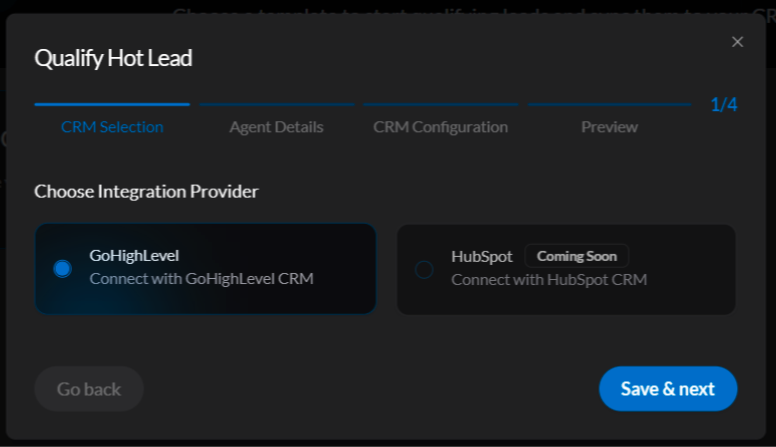
- Configure CRM Integration - In the “Qualify Hot Lead” pop-up window: - Under CRM Selection , choose GoHighLevel - Click Save & next to proceed
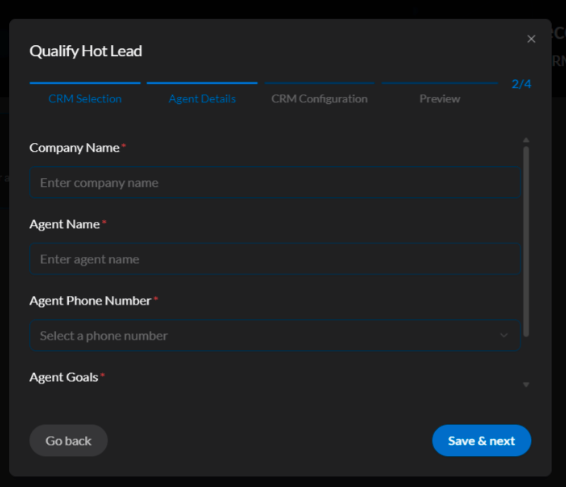
- Enter Authentication Details Define Agent Configuration Complete the Agent Details screen with the following information: - Company Name: Enter your business name - Agent Name: Provide a professional name for your AI agent - Agent Phone Number: Select the phone number for agent operations - Agent Goals: Define clear objectives for lead qualification conversations
- Configure CRM Pipeline Mapping In the CRM Configuration section, use the dropdown menus to connect the template: - Pipeline: Select your GoHighLevel pipeline (e.g., “Dialora Test”) - Lead Qualified Stage: Choose the stage for successfully qualified leads - Lead Lost/Not Qualified Stage: Select the stage for unqualified leads
- Finalize Template Setup - Click Save & next to proceed to the preview screen - Review all configuration details carefully Click Create lead to activate the template
Your Dialora lead qualification template is now active and ready to process leads.
Part 5: Creating the GoHighLevel Workflow
The final step creates an automated workflow in GoHighLevel that sends new contact information to Dialora using webhook integration.
Step 5: Configure Webhook Integration and Build Automation
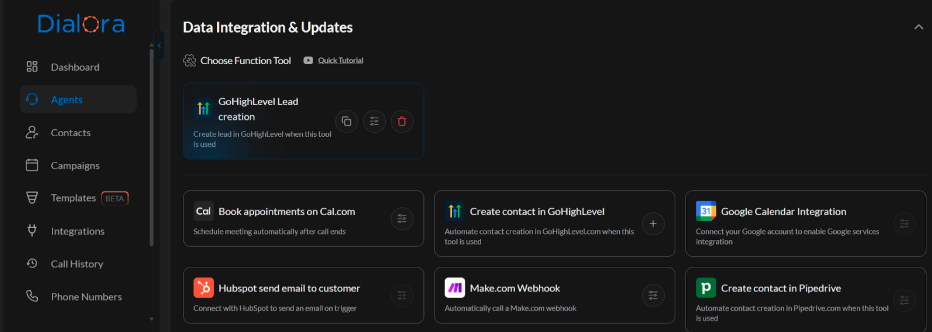
- Obtain the Dialora Webhook URL - Access Agent Settings - Navigate to the Agents tab in your Dialora account - Select the agent you created and click on Advanced Settings
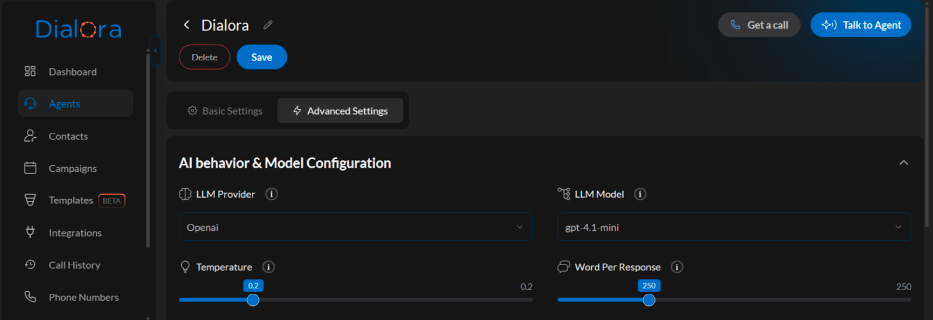
- Copy Webhook URL - Scroll down to the Data Integration & Updates section - Locate the GoHighLevel Lead creation tool - Click the copy button to copy the unique Webhook URL
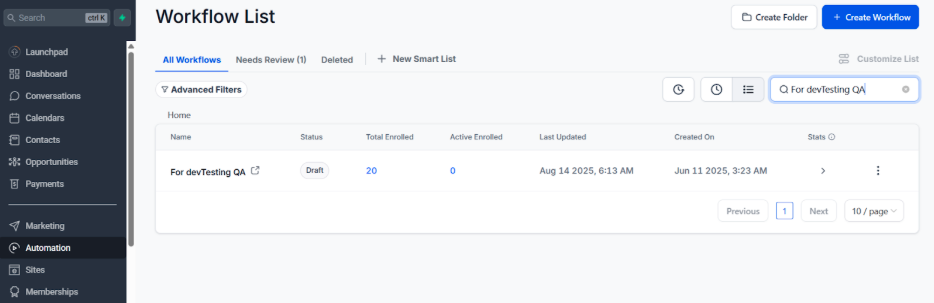
- Build the GoHighLevel Automation Workflow - Create New Workflow - Log back into your GoHighLevel account - Navigate to Automation → Workflows in the left-hand menu - Click Create Workflow in the top right corner
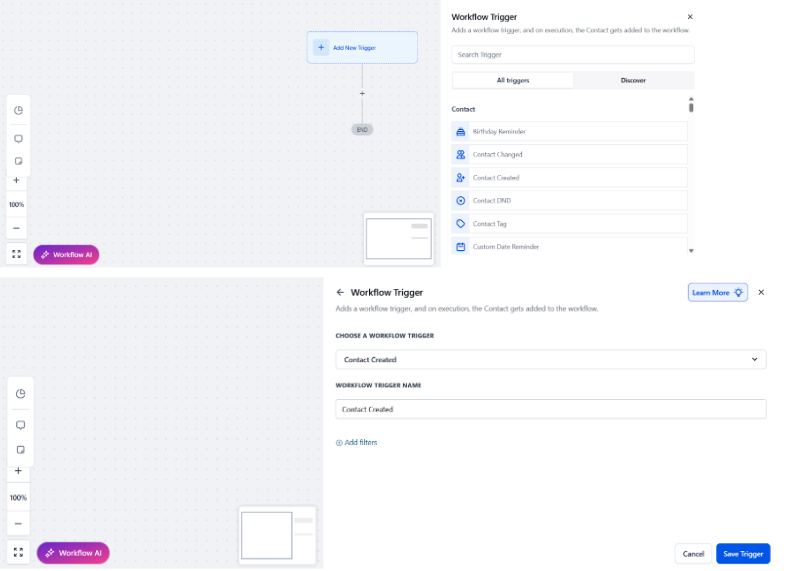
- Configure Contact Created Trigger - On the workflow canvas, click Add New Trigger - In the right-hand sidebar, search for and select Contact Created - This trigger activates whenever a new contact is added to your account - Click Save Trigger
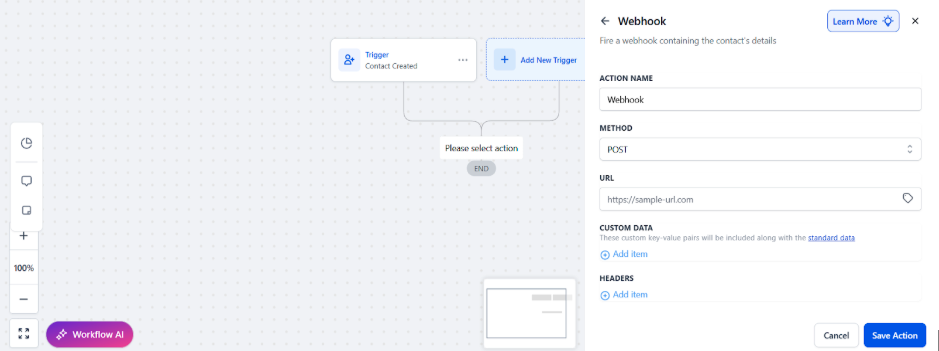
- Add Webhook Action - Click the plus (+) icon below the trigger - Search for and select Webhook in the sidebar - Configure the webhook settings: - Set Method to POST - Paste the Dialora Webhook URL in the URL field - Click Save Action
- Publish Workflow - Review your complete workflow setup - Click Publish to activate the automation - Verify the workflow status shows as active
Final Results and System Operation
Complete Integration Workflow
Your fully automated system now operates as follows:
- Trigger Event: New contact creation in GoHighLevel automatically triggers the workflow
- Data Transfer: Contact details are sent to Dialora via the configured webhook
- AI Qualification: The Dialora agent initiates an outbound qualification call
- Pipeline Update: Based on conversation outcomes, the agent automatically updates the contact’s status
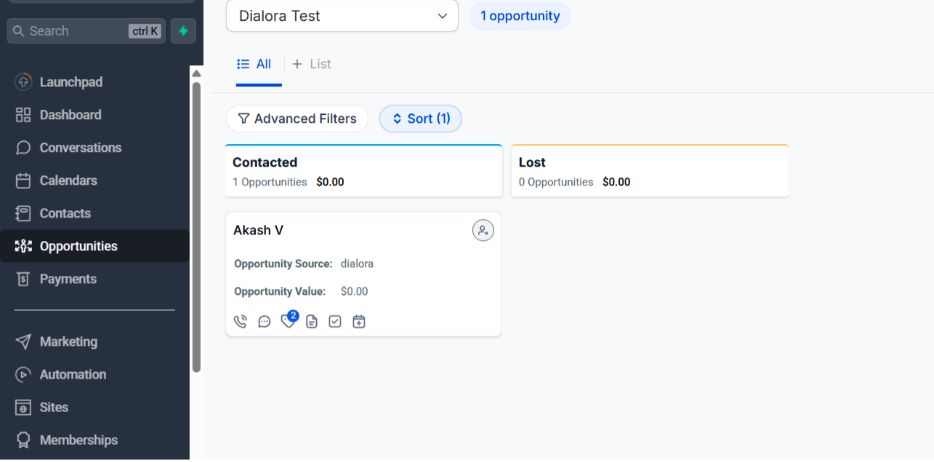
- Stage Management: The opportunity card moves to the appropriate pipeline stage (Contacted, Qualified, or Lost)
Expected Results
With your integration complete, you now have a fully automated lead qualification system. When new contacts are created in GoHighLevel:
- The workflow automatically triggers and sends contact details to Dialora
- Your Dialora agent initiates qualification calls
- Based on conversation outcomes, contacts are automatically moved to appropriate pipeline stages
- Your sales team receives pre-qualified leads with detailed interaction history
Verification Steps
- Test the Integration: Add a test contact to GoHighLevel using a phone number you can answer
- Monitor Workflow: Verify the workflow triggers and webhook executes successfully
- Confirm Agent Call: Answer the qualification call from your Dialora agent
- Check Pipeline Update: Verify the contact moves to the correct pipeline stage based on qualification results
Troubleshooting Common Issues
- Webhook Not Firing: Verify webhook URL is correctly copied and Dialora service is active
- Authentication Errors: Double-check Location ID and API Key accuracy
- Pipeline Updates Failing: Ensure stage names match exactly between platforms
- No Agent Calls: Verify phone number configuration and account credits
Conclusion
This integration creates a powerful automated lead qualification system that reduces manual work while maintaining consistent lead processing. The visual references throughout this guide ensure accurate implementation of each configuration step. Your sales team can now focus on closing qualified leads while the AI handles initial qualification calls and pipeline management automatically.